Install OpenCloud - simply on your own server
Would you like to run OpenCloud productively - with your own domain, valid TLS certificates and Weboffice? In this article, you will learn step by step how to set up OpenCloud on an existing server and integrate it seamlessly into your infrastructure.

As our manual describes, OpenCloud can be used in a wide variety of scenarios - from a local test system to a fully-fledged cloud service with web office, user management and email connection. In this article, we show the path to productive deployment: on a real server with a public domain, valid TLS certificates and existing services such as Apache.
The special feature: We do not install OpenCloud on the proverbial "green field", but integrate it into an already running environment with Ubuntu 24.04 LTS - without disrupting other services. Our goal: a secure, container-based setup with Apache as a reverse proxy, Docker Compose and everything you need for stable productive operation.
Prerequisites for your own OpenCloud server
To be able to run OpenCloud on your own server, you need a few basic prerequisites. The best option is a root server or vServer with a Linux distribution of your choice. It is important that you have full administrative access, as some of the steps require root rights.
For productive operation, you should also prepare the following points:
- Your own domain with suitable subdomains such as cloud., collabora. and wopiserver... pointing to the IP address of your server, which point to the IP address of your server.
- TLS certificates, ideally from Let's Encrypt, to secure the services via HTTPS.
- Docker and Docker Compose, as OpenCloud is container-based (more on this in the section "Installing Docker: The basis for OpenCloud").
- Apache or another web server that acts as a reverse proxy between the Internet and containers.
In our example, we installed OpenCloud on a root server with Ubuntu 24.04 LTS. An Apache web server was already set up and occupied ports 80 and 443 - so we did not use Traefik. Instead, we use Apache as a reverse proxy for the OpenCloud services.
The following subdomains were configured in the DNS zone and point to the server IP:
- blog.opencloud.rocks
- cloud.blog.opencloud.rocks
- collabora.blog.opencloud.rocks
- wopiserver.blog.opencloud.rocks
A valid certificate for blog.opencloud.rocks was already available. To ensure that the subdomains are also securely accessible, we created valid TLS certificates for them in advance.
Creating TLS certificates for OpenCloud subdomains
In order for you to be able to use OpenCloud via HTTPS later on, all required subdomains need valid TLS certificates. As Apache acts as a reverse proxy and handles the TLS termination, no integrated proxy such as Traefik is used here.
The easiest way to create certificates is with Let's Encrypt. To use certbot - the official client for Let's Encrypt - Apache must already be able to serve the subdomains. The actual target, such as OpenCloud or Collabora, is not important at this stage. It is crucial that Apache processes the domain correctly and responds to HTTP requests. To do this, set up placeholder VirtualHosts that deliver simple static HTML pages.
For each subdomain - in our case cloud.blog.opencloud.rocks, collabora.blog.opencloud.rocks and wopiserver.blog.opencloud.rocks - there is a separate configuration file in /etc/apache2/sites-available/. A VirtualHost for cloud.blog.opencloud.rocks could look like this, for example:
<VirtualHost *:80>
    ServerName cloud.blog.opencloud.rocks
    DocumentRoot /var/www/placeholder-cloud

    <Directory /var/www/placeholder-cloud>
        Options -Indexes
        AllowOverride None
        Require all granted
    </Directory>

    ErrorLog ${APACHE_LOG_DIR}/cloud_error.log
    CustomLog ${APACHE_LOG_DIR}/cloud_access.log combined
</VirtualHost>
To make Apache respond to requests, create the associated directory and create a simple placeholder page:
sudo mkdir -p /var/www/placeholder-cloud

echo "OpenCloud preparation" | sudo tee /var/www/placeholder-cloud/index.html
Then activate the site and reload the configuration:
sudo a2ensite cloud.blog.opencloud.rocks.conf
sudo systemctl reload apache2
Proceed in the same way for collabora.blog.opencloud.rocks and wopiserver.blog.opencloud.rocks - each with its own directory (for example /var/www/placeholder-collabora and /var/www/placeholder-wopiserver) and a suitable VHost configuration.
If all three subdomains are accessible, use certbot to request a shared TLS certificate:
sudo certbot --apache \
  -d cloud.blog.opencloud.rocks \
  -d collabora.blog.opencloud.rocks \
  -d wopiserver.blog.opencloud.rocks
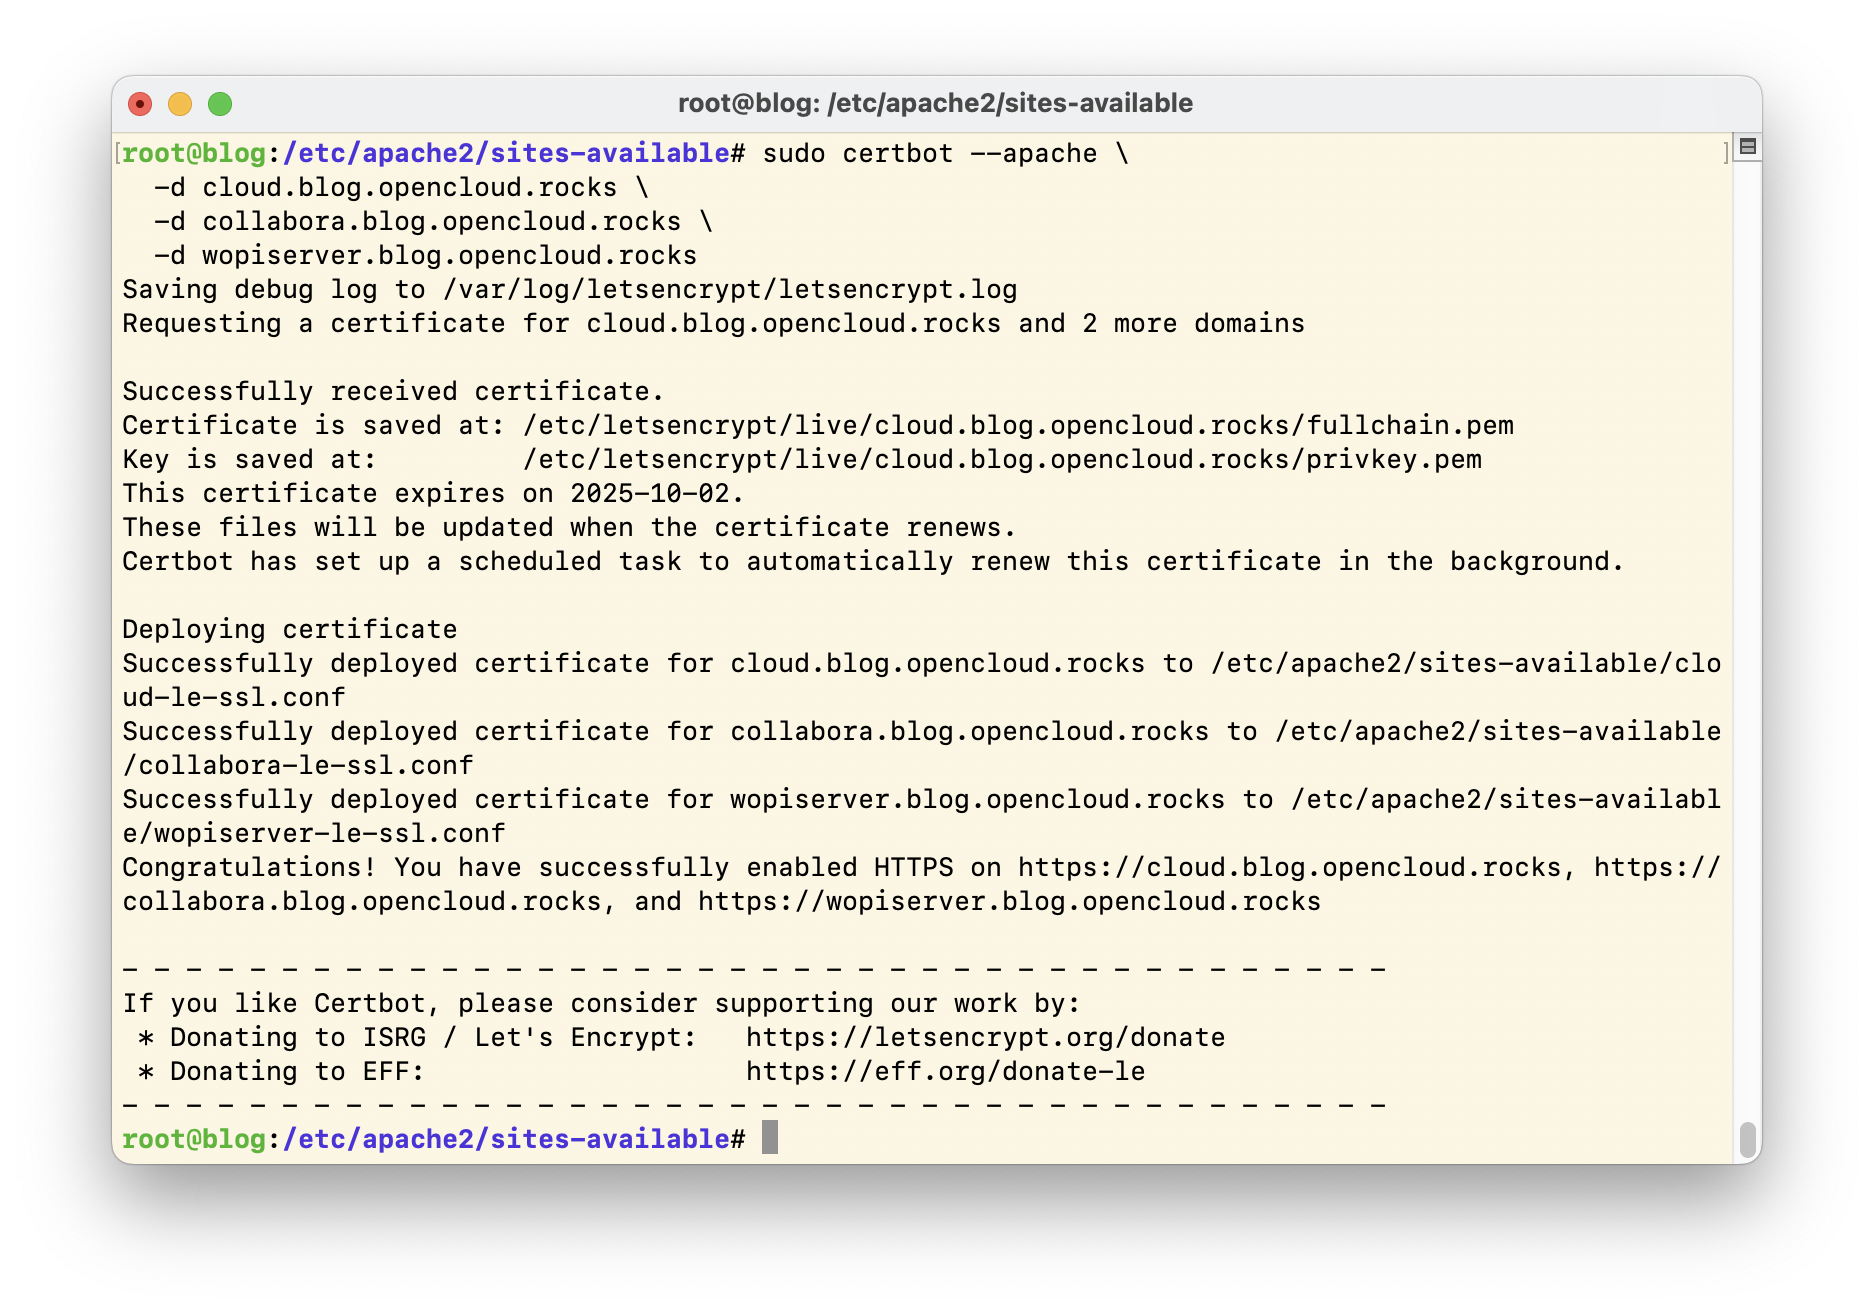
certbot automatically recognises the existing VHosts, performs the HTTP-01 challenge and adds the necessary TLS settings to the Apache configuration. For the subdomains, certbot requests a common SAN certificate (Subject Alternative Names) that covers all three subdomains. You will then find the generated certificates in the /etc/letsencrypt/live// directory; they will be automatically renewed in future.
Setting up Apache as a reverse proxy
Once the TLS certificates have been set up, you can configure Apache so that HTTPS requests are forwarded to the correct services in your Docker setup. To do this, replace the previous placeholder VHosts with productive configurations with an activated reverse proxy.
Each subdomain forwards requests to an internal Docker service - OpenCloud, the WOPI server or Collabora. Apache handles the TLS termination and forwards the request internally to the correct container via HTTP or WebSockets.
Example: Providing OpenCloud (port 9200) via cloud.blog.opencloud.rocks
<IfModule mod_ssl.c>

<VirtualHost *:443>
    ServerName cloud.blog.opencloud.rocks

    SSLEngine on
    SSLCertificateFile /etc/letsencrypt/live/cloud.blog.opencloud.rocks/fullchain.pem
    SSLCertificateKeyFile /etc/letsencrypt/live/cloud.blog.opencloud.rocks/privkey.pem

    ProxyPreserveHost On
    ProxyPass / http://127.0.0.1:9200/
    ProxyPassReverse / http://127.0.0.1:9200/

    ErrorLog ${APACHE_LOG_DIR}/cloud_error.log
    CustomLog ${APACHE_LOG_DIR}/cloud_access.log combined
</VirtualHost>

</IfModule>
Example: Connect WOPI server (port 9300) via wopiserver.blog.opencloud.rocks
<IfModule mod_ssl.c>

<VirtualHost *:443>
    ServerName wopiserver.blog.opencloud.rocks

    SSLEngine on
    SSLCertificateFile /etc/letsencrypt/live/cloud.blog.opencloud.rocks/fullchain.pem
    SSLCertificateKeyFile /etc/letsencrypt/live/cloud.blog.opencloud.rocks/privkey.pem

    ProxyPreserveHost On
    ProxyPass / http://127.0.0.1:9300/
    ProxyPassReverse / http://127.0.0.1:9300/

    ErrorLog ${APACHE_LOG_DIR}/wopi_error.log
    CustomLog ${APACHE_LOG_DIR}/wopi_access.log combined
</VirtualHost>

</IfModule>
Collabora (port 9980): WebSockets, headers and many pitfalls
The configuration for Collabora deserves special attention. To ensure that the integration works reliably - especially the Office preview and editing - you need to observe a few additional rules. The challenge: In addition to classic HTTP calls, Collabora also uses WebSockets, and these must be explicitly passed through. This is what a working configuration for collabora.blog.opencloud.rocks looks like:
<IfModule mod_ssl.c>

<VirtualHost *:443>
    ServerName collabora.blog.opencloud.rocks

    SSLEngine on
    SSLCertificateFile /etc/letsencrypt/live/cloud.blog.opencloud.rocks/fullchain.pem
    SSLCertificateKeyFile /etc/letsencrypt/live/cloud.blog.opencloud.rocks/privkey.pem

    ProxyPreserveHost On
    AllowEncodedSlashes NoDecode

    # WebSockets
    ProxyPassMatch "/cool/(.*)/ws$" ws://127.0.0.1:9980/cool/$1/ws nocanon
    ProxyPassMatch "^/cool/adminws$" ws://127.0.0.1:9980/cool/adminws

    # Default routes
    ProxyPass /cool http://127.0.0.1:9980/cool
    ProxyPassReverse /cool http://127.0.0.1:9980/cool
    ProxyPass /hosting/discovery http://127.0.0.1:9980/hosting/discovery
    ProxyPassReverse /hosting/discovery http://127.0.0.1:9980/hosting/discovery
    ProxyPass /browser http://127.0.0.1:9980/browser
    ProxyPassReverse /browser http://127.0.0.1:9980/browser

    # Important header for HTTPS connection
    RequestHeader set X-Forwarded-Proto "https"

    # Increase timeout limits
    ProxyTimeout 300
    ProxyIOBufferSize 65536

    ErrorLog ${APACHE_LOG_DIR}/collabora_error.log
    CustomLog ${APACHE_LOG_DIR}/collabora_access.log combined
</VirtualHost>

</IfModule>
Enable Apache modules
In order for this to work, the necessary Apache modules must also be enabled on the system:
$ sudo a2enmod proxy proxy_http ssl headers proxy_connect proxy_wstunnel
[...]
$ systemctl restart apache2
Note: The previously set up placeholder VHosts (e.g. cloud.blog.opencloud.rocks.conf) are used exclusively to generate the TLS certificates with certbot. Do not change these files later for productive use! Instead, create your own configuration files for the HTTPS VirtualHosts, which Apache will later use as a reverse proxy. As soon as these new configurations are active, the placeholder VHosts can be safely deactivated and deleted.
Disable placeholder VHosts now
You had previously set up simple placeholder VHosts for the TLS certificates - one configuration per subdomain, which only delivered a static HTML page. These placeholders were necessary so that certbot could verify the domains and issue a valid certificate from Let's Encrypt.
Now that Apache is working productively as a reverse proxy and the new VHosts are active, you can remove the old configurations. Otherwise, Apache would try to load multiple VHosts for the same subdomain - this leads to error messages when restarting the web server.
How to deactivate the superfluous placeholder sites:
sudo a2dissite cloud.blog.opencloud.rocks.conf
sudo a2dissite collabora.blog.opencloud.rocks.conf
sudo a2dissite wopiserver.blog.opencloud.rocks.conf
Then reload Apache:
systemctl restart apache2
This clears the way for the actual OpenCloud system - accessible via the configured subdomains with a valid TLS certificate and secure proxy access.
Install Docker: The basis for OpenCloud
Before you can start OpenCloud on your server, a few requirements should be met: Docker and Docker Compose (version 2) must be installed, your domain must point to the server, and you should basically be familiar with the concept of Docker Compose. Sounds complicated? It's not - and you don't need to be a professional to get started.
Especially important: Make sure you use Docker Compose version 2. In some Linux distributions - such as Debian 12 "Bookworm" - the outdated version 1 is still included in the standard packages. This means that OpenCloud does not work reliably.
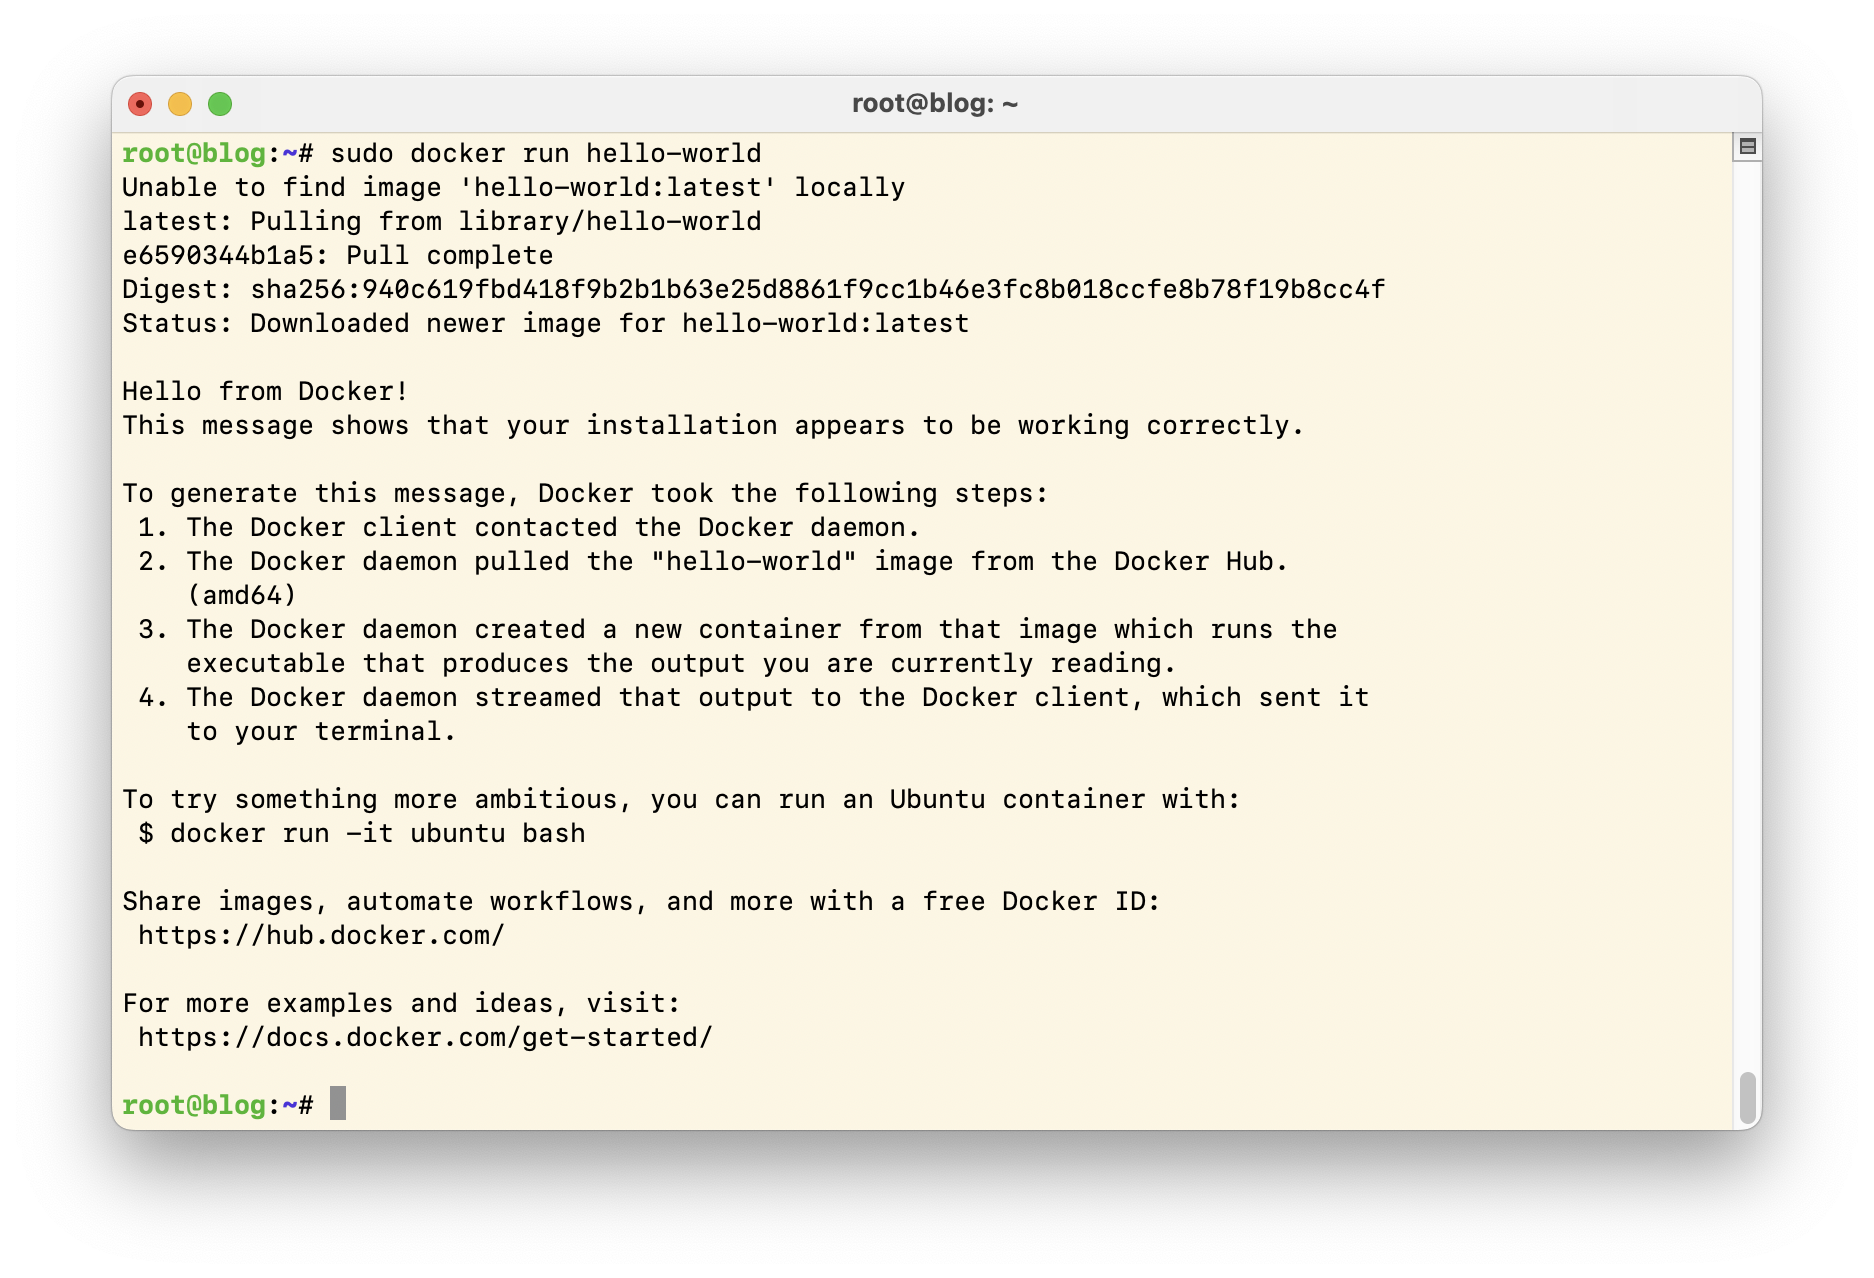
The safest method: Install Docker directly according to the official instructions. This will ensure that all components are up to date - including docker compose, which will later start and manage all services together. You can easily check whether Docker is set up correctly with this command:
sudo docker run hello-world
Tip: If you want your normal user to be able to execute Docker commands without sudo, add them to the Docker group:
sudo usermod -aG docker $USER
After the next login, the change will be active - and nothing will stand in the way of your OpenCloud setup.
Prepare OpenCloud: Clone repository and set up configuration
To ensure that your OpenCloud setup starts smoothly, the first step is to clone the official Compose repository and then adapt the configuration to your environment.
Change to a suitable directory and execute the following commands:
git clone https://github.com/opencloud-eu/opencloud-compose.git
cd opencloud-compose
Now create your personal environment file based on the template provided:
cp .env.example .env
Open the .env file with a text editor and enter the following parameters:
# Domain under which OpenCloud should later be accessible
OC_DOMAIN=cloud.blog.opencloud.rocks

# Admin password for the first login (user name: admin)
INITIAL_ADMIN_PASSWORD=

# Subdomains for Weboffice and WOPI service
COLLABORA_DOMAIN=collabora.blog.opencloud.rocks
WOPISERVER_DOMAIN=wopiserver.blog.opencloud.rocks
Tip: To generate a secure password, you can use the pwgen tool on the command line:
$ pwgen -cny 12 1
aij)aeSh8mai
The -cny options ensure that the generated password contains at least one capital letter (-c), one number (-n) and one special character (-y).
Select services: Which OpenCloud components should start?
OpenCloud relies on Docker Compose - and allows you to specifically select which components you really need. The central variable in the .env file for this is called COMPOSE_FILE. It determines which services are taken into account when Docker Compose is started.
For the setup with Apache as a reverse proxy and the online editing of documents with Collabora, enter the following:
COMPOSE_FILE=docker-compose.yml:weboffice/collabora.yml:external-proxy/opencloud.yml:external-proxy/collabora.yml
This selection starts:
- OpenCloud: the central platform
- Collabora Online: for editing Office documents directly in the browser
- Apache-specific proxy configurations: so that OpenCloud and Collabora run cleanly behind your reverse proxy
This means your setup is fully prepared: You combine full control over TLS and routing with the full functionality of OpenCloud. The next step is to start the containers - and log in for the first time.
Starting OpenCloud: Starting up and checking containers
Now it's time to get down to business: You have set up the .env file, prepared Apache as a reverse proxy and selected all the desired services via COMPOSE_FILE. Now it's time to start OpenCloud.
First, download all the required container images:
docker compose pull
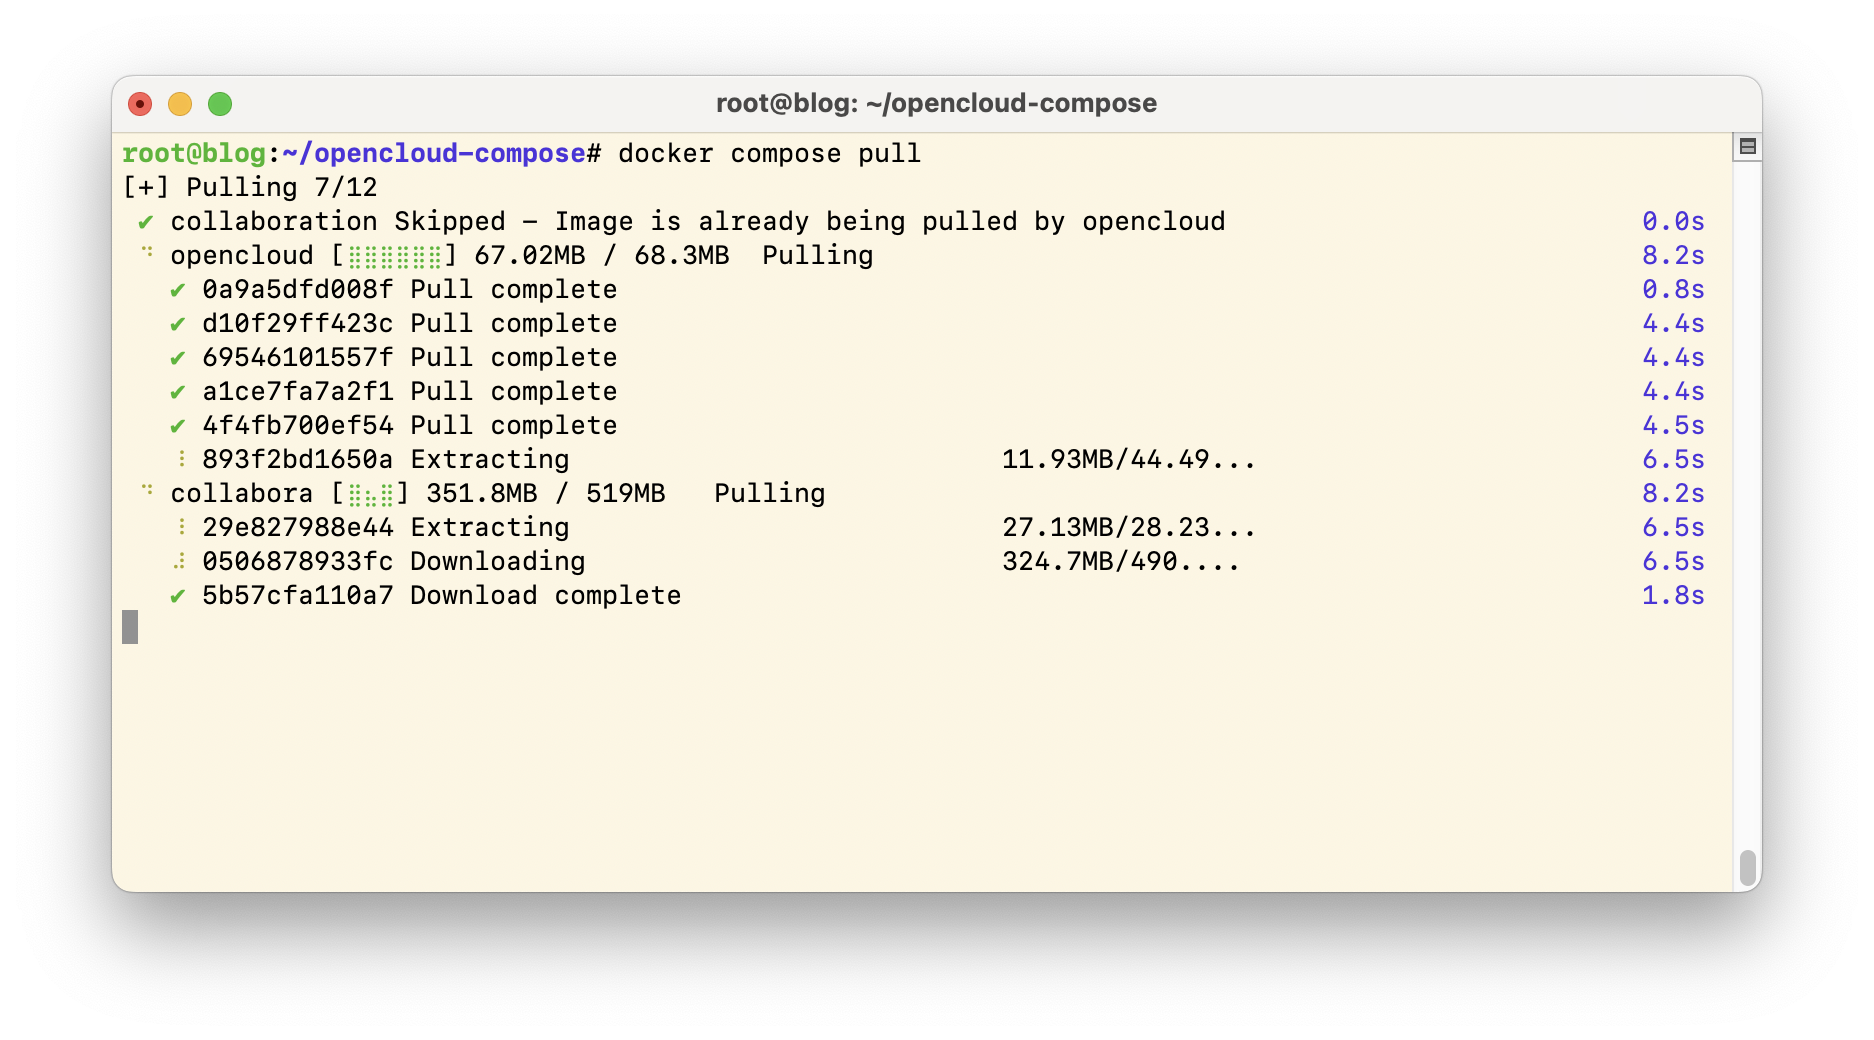
This command ensures that Docker has all the images for your setup ready locally - including OpenCloud itself, Collabora for editing Office documents and the associated databases.
Then start all configured services in the background:
docker compose up -d
The -d stands for "detached mode": The containers continue to run in the background - even if you close the terminal.
A quick look with docker ps shows whether everything is running as planned:
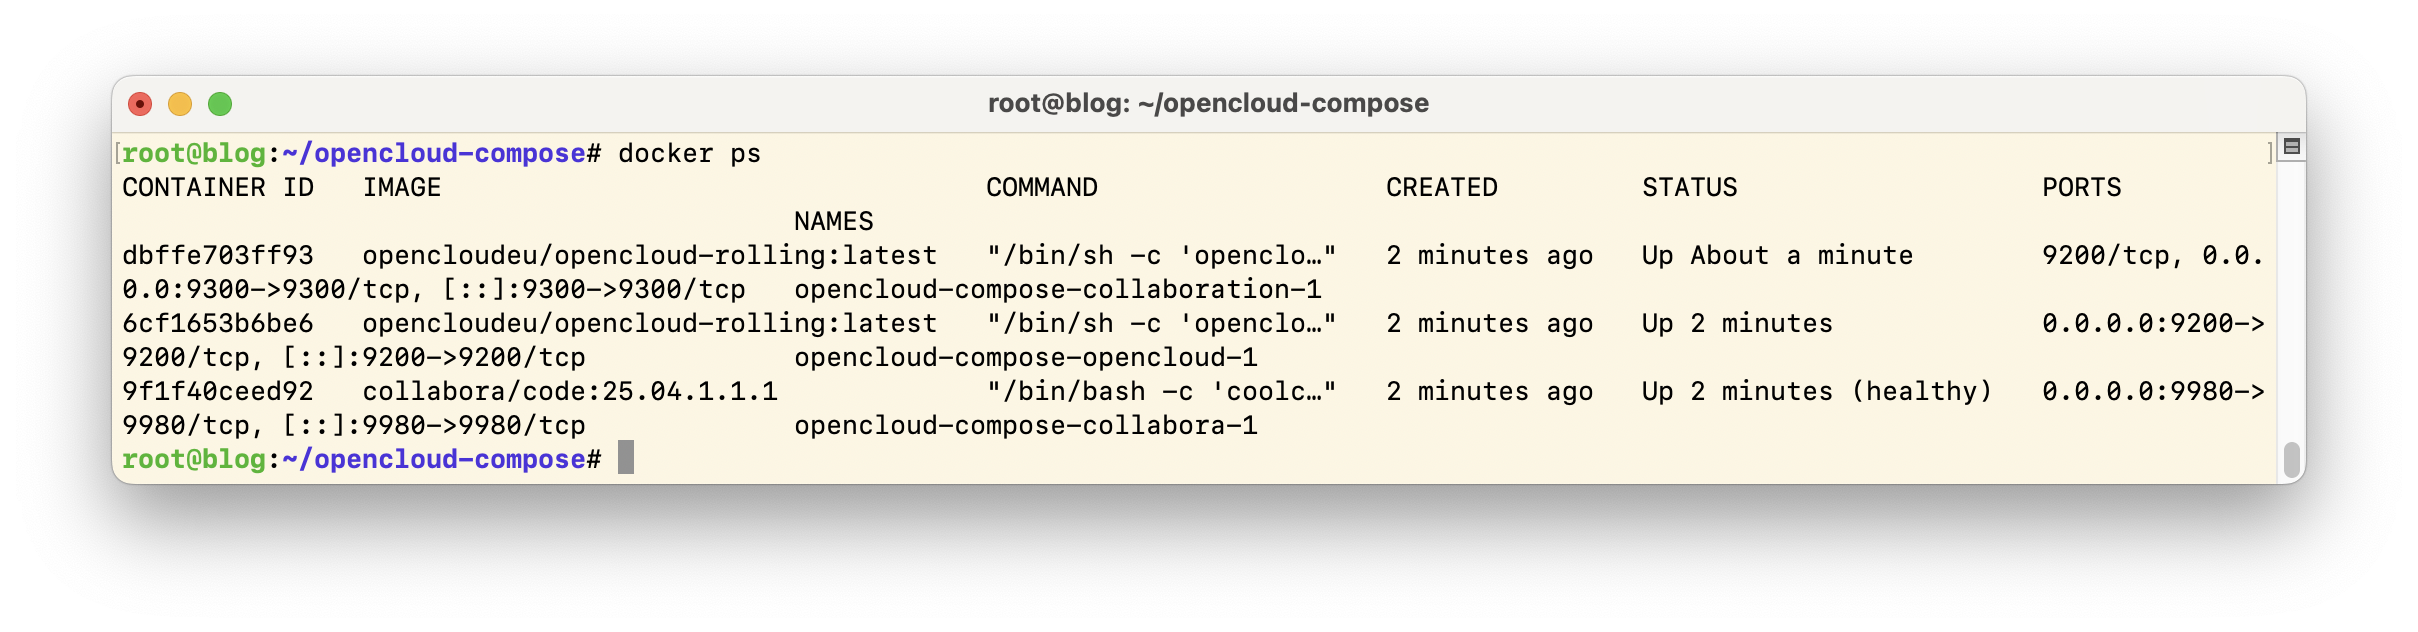
In the list of running containers, you should see opencloud and collabora, among others. As soon as everything has started, you can call up the OpenCloud web interface in the browser - under the domain that you have set in the .env file.
Calling up OpenCloud in the browser
Once all containers are running, open your browser and call up the configured subdomain.
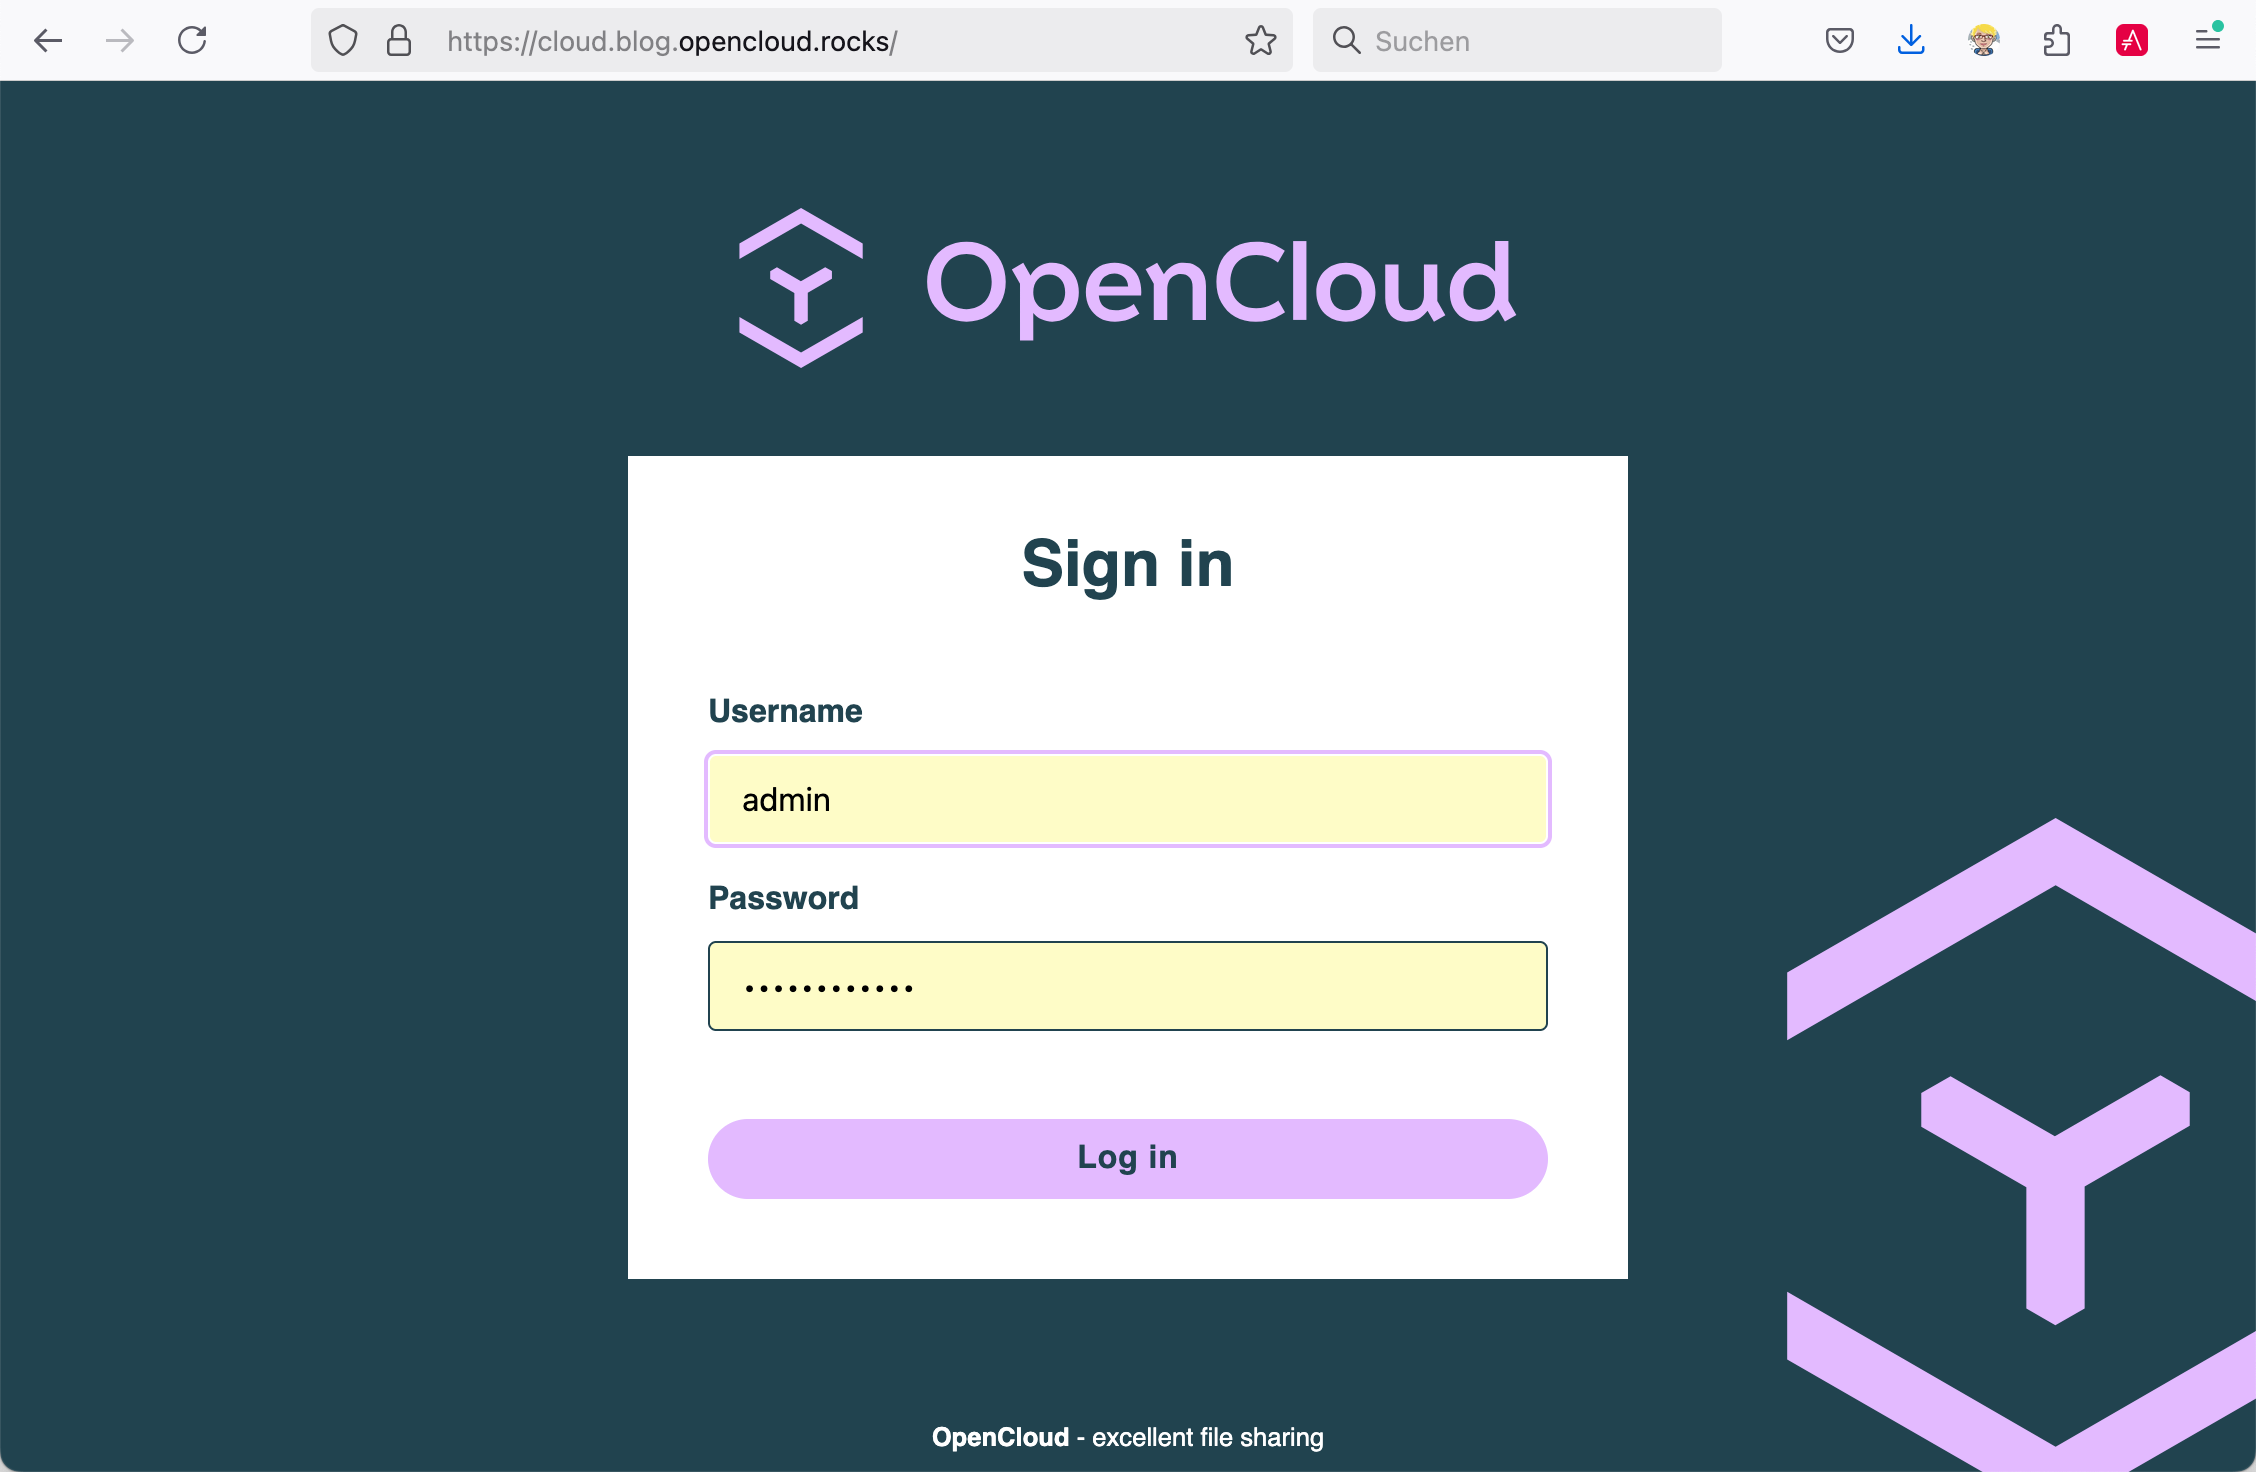
You should now see the OpenCloud login page. For the first login, use the user name admin and the password that you previously defined in the .env under INITIAL_ADMIN_PASSWORD.
Note: After logging in, you should change the password immediately.
If everything works, your own OpenCloud instance is ready for operation - securely accessible via HTTPS and integrated into your existing infrastructure.
Don't forget storage: Save OpenCloud data permanently
For productive operation of OpenCloud, it is not enough for the login to work - your data and settings must be retained even after a restart. Without dedicated storage paths, they will otherwise end up in anonymous Docker volumes that are difficult to back up and almost impossible to manage. A separate directory outside the container is therefore recommended for clean and reliable data storage.
One possible location for this is /srv/opencloud. According to the Filesystem Hierarchy Standard (FHS), /srv stands for "Data for services provided by the system" - which is exactly what OpenCloud does. While paths such as /opt or /var/lib are intended more for third-party software or temporary runtime data, /srv offers a clear separation, can be used consistently and can be easily backed up or integrated into backups. Even /home is not ideal, as typically only user data is stored there - not the services themselves. If you have mounted your own data drive, you can alternatively use /mnt/opencloud or similar.
In the first step, create the required directories for configuration, data and extensions:
mkdir -p /srv/opencloud/{config,data,apps}
chown -R 1000:1000 /srv/opencloud
The user with the UID 1000 is the default user within the container. In order for OpenCloud to access the new paths, the account must be the owner of the directories. The structure therefore looks like this:
/srv/opencloud/
├── config/ → Config files from OpenCloud
├── data/ → User data, files, content
└── apps/ → local web extensions if necessary
Then enter the new storage locations in your .env:
# OpenCloud storage locations for configuration, data and apps (local extensions)

# Configuration directory - persistent, e.g. config.php, web settings, etc.
OC_CONFIG_DIR=/srv/opencloud/config

# Data directory - this is where the users' files are stored
OC_DATA_DIR=/srv/opencloud/data

# Apps directory - for manually installed extensions (optional)
OC_APPS_DIR=/srv/opencloud/apps
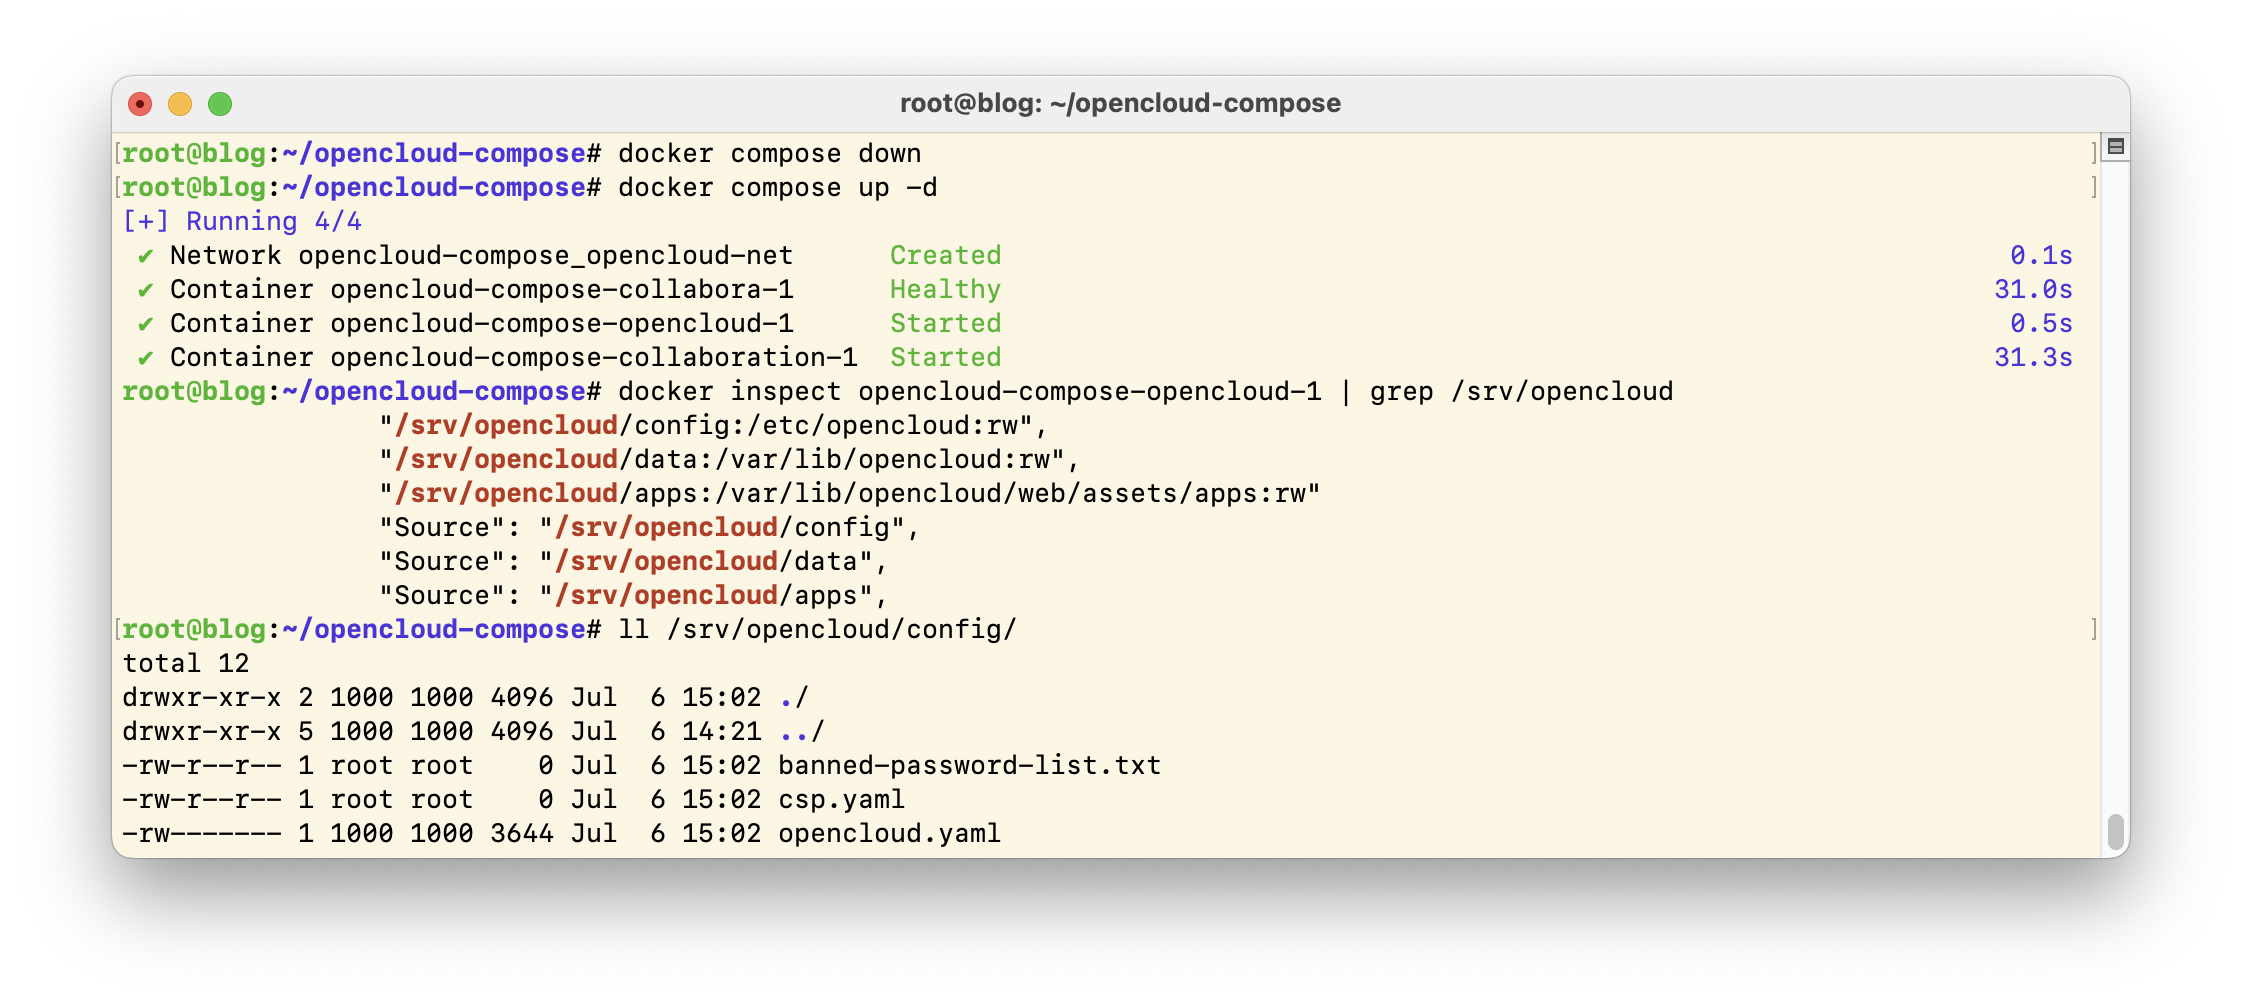
Then stop the running services and restart them with the customised configuration:
docker compose down
docker compose up -d
Now OpenCloud uses the persistent directories on your server - update-proof, secure and transparent.
To check whether everything is set up correctly, take a look at the running setup:
docker inspect opencloud-compose-opencloud-1 | grep /srv/opencloud
ls -l /srv/opencloud/config
If the config.php file has been recreated, your configuration is successful - OpenCloud now permanently saves all data outside the container. This is an important step for anyone who wants to operate their instance in a stable manner in the long term.
OpenCloud on your own server - flexible, secure, confident
With just a few targeted steps, you can get OpenCloud up and running on your own server - including reverse proxy, TLS encryption and permanent storage. The result: a fully functional cloud platform that integrates seamlessly into your infrastructure without any dependency on external providers. Whether at work, at school or at home - with OpenCloud, you retain control over your data and remain technically independent.